Showing posts with label non-cookie baking. Show all posts

Tuesday, August 11, 2009

Cookie Filled Cupcakes


they look like normal, unassuming cupcakes.
but they have a surprise inside them...

cookie dough!

these are so simple, and so decadent. just make your cupcakes as normal, but put a bit of frozen cookie dough in the batter before you bake them, like so:


you must freeze the cookie dough, at least 2 hours, or else the dough will bake and you'll have an odd crispy mess in the middle instead of a bit of cookie dough.

i'm not gonna lie, i used a chocolate cake mix for these and frozen break-n-bake cookie dough. i broke my own rule and used off-brand cake mix, and i paid the price for it. the cake part wasn't that great, sort of dry, but the cookie dough more than made up for it.

and i topped these with a ganache made with one part (1/2 cup) cream and two parts (1 cup) semisweet chocolate chips. at first, i was thinking i should have used milk chocolate, but the semisweet was perfect. the cupcakes were quite sweet, so the semisweet ganache added a good contrast in sweetness and texture.


i was inspired by recipes on allrecipes.com and cakemixdoctor.com. this is an easy recipe that is easily adaptable, and the possibilities are endless! i had some more break-n-bake dough so i made more cupcakes with yellow cake mix (name brand this time) and ganache topping... so good. just imagine the flavor combinations with this cake, cookie, and frosting/topping combination!

Monday, July 20, 2009

Maple Peach Apple Crumble

another adventure in crumble! also another adventure in, "what the heck am i going to make with these ingredients?"

i bought some peaches meaning to grill them, and then i decided that i didn't want to go through the hassle. so instead i chopped them up and put them into a pan and tossed them in a little cinnamon and sugar (a tablespoon or so). there weren't enough peaches to fill out the 8x8 pan, so i chopped up an apple to add to the mix, again tossing to coat with some sugar and cinnamon.


then, the glorious topping... i used a packet of maple brown sugar instant oatmeal, about 1/4 cup all purpose flour, probably about 1/2 cup brown sugar, about a half a stick of cold butter, with a pinch of salt and a dash of cinnamon. then, i cut it together with a pastry cutter (a fork would also work). i think i ended up adding some more butter and brown sugar, and a bit of flour, because i wanted a lot of crumble. like i've said before, that's the best part anyway.

i threw that sucker in a 350 degree oven for about 30 minutes, or until the topping was crispy and nothing (i.e. apples) was too firm when i stuck a fork in it. really, nothing in this needs to be cooked--you could just eat it raw and be a-ok--it just tastes better warm. so, if you don't cook it enough, it's really no big deal. or, if you take a bite and it's not cooked to your liking, just put it back in for ten minutes or so.


here's a side view, after it came out of the oven. it's pretty shallow, but you can sort of see that there's quite a bit more crumble than fruit, or at least equal parts.


fruity crumbles like this are a shoot from the hip, or fly by the seat of your pants, kind of dessert (you can pick your own idiom there). no real chemical reactions need to happen, like leavening in cakes, so you don't have to worry about proportions too much. nothing needs to be cooked, like eggs in cookies (although i eat raw cookie dough all the time), so you don't have to worry too much about bake times. and most of the flavors are in the fruit, so you don't need to really add anything. and, if you screw up, you can fix it along the way. you can always sprinkle on some more sugar or bake it a little longer.

in short, i'm a fan of making fruit crumbles. easy and delicious! here's the damage done after one evening- about half gone... because it was so tasty!

Sunday, July 19, 2009

Gourmet (Looking) Blueberry Muffins


my parents go to a small church with only the main worship service (no sunday school or anything), and it gets out pretty early, at around 10am. so we usually go to breakfast afterwards. well, one sunday, we went to mimi's cafe, and i ordered a meal that had a blueberry muffin with it. i was so full from everything else that i couldn't eat the muffin, but it looked so good that i wanted to save it for later... but my parents wanted it right then! when i protested, my mom said, "why don't we just make some blueberry muffins today?" i acquiesced, and she ate part of my muffin.

so, after we left the restaurant, we went to the grocery store and bought a blueberry muffin mix. i wanted to get some additional fresh blueberries to put in there, but instead we just got a mix that boasted having a can of real blueberries (betty crocker, i think), which was enough for me.

when we got home, i made the muffins. i followed the directions on the box and everything. but, you know me, i can't leave well enough alone when it comes to cake mixes. so i made a crumble topping and put a generous amount of that on the muffins, and also topped them with sparkle sugar!


the muffins baked up so nice and golden brown, and a little crunchy with the sugar and the crumble. oh man, were they good!


they looked so gourmet and special, and they tasted delicious! i was so impressed with those muffins, even more than i usually am.

so, here's the "recipe:"
  • make the muffin mix: this is pretty self-explanatory--get a mix and follow the directions. fill the muffin tin cups only about halfway, to leave room for the crumble, which is really the best part anyway.
  • make the crumble topping: crumble topping is an inexact process, but here's a good starting point: 1/2 cup flour, 1/2 packed brown sugar, 1/2 stick cold butter (you want a crumble, not a dough), and a splash of cinnamon (optional) and a pinch of salt (also optional). pulse in a food processor. or if you don't have one, like me, use a fork or a pastry cutter to sort of mash the butter and the sugar together. if you think it needs more sugar or butter, add it. you can also add some oatmeal instead of some of the flour, or in addition. like i said, crumble topping is quite imprecise. just do it until it tastes good.
  • spoon the crumble into the muffin cups. be liberal! like i said, the crumble topping is really the best part anyway.
  • sprinkle each muffin with a pinch or two of sparkle sugar.
  • bake as directed on the muffin mix, maybe a little longer to crisp up the crumble topping.
  • voy-ola! gourmet muffins that nobody will ever know came from a mix!

Patriotic Cupcakes

(picture from the salty cod)

what's more patriotic and american than apple pie? the answer is simple: cupcakes.

cupcakes came about in the 1800's in america, making them another great american invention. the name comes both from the small proportions--the original ones were baked in earthenware cups and such--and from their proportions, measured in cups. the original cupcake recipe is 1 cup butter, 2 cups sugar, 3 cups flour, 4 eggs. and, this was a big switch from weighing ingredients to measuring them by volume, using the anglo-american 'cup' instead of the metric system. this switch made them easier for the everyman (well, everywoman really) to make, as did the cupcake's diminutive size, because big cakes often took a really long time to cook over a hearth and often burned, but those problems were reduced with cupcakes. (thanks to food timeline and cupcakes take the cake for the history!)

alright, enough with the history lesson, let's get to the baked goods! i made some patriotic cupcakes for the fourth of july (which i fully realize was a good two weeks ago). first, i made some delicious red velvet cake cupcakes (yes, from a mix), and piped on some (canned) cream cheese frosting, and topped with blue sugar for a patriotic flair--red cake, white frosting, and blue sugar!


then, i made some red, white, and blue cupcakes--the batter itself was red, white, and blue! i divided the white cake batter (again, mine's from a box) and dyed one part red and one part blue (BIG NEWS: i got wilton gel colors! so now my stuff will be nice and bright, not like the weak colors i had on my cupcake burgers). so, i saw this on chica and jo and knew i had to make them. only mine weren't as swirl-y as chica and jo's, but they still looked awesome. and the patriotic cupcake wrappers didn't hurt...


and i frosted mine with (canned) chocolate cream cheese frosting, because i have a penchant for chocolate. i wanted to pipe it on and make it look all spiffy... but after i piped a few, the frosting started melting and sliding off. so after i frantically yelled for my mom to come help me, i scraped all the frosting off and just spread it on with a butter knife. but they still needed a little something extra... so i put sparkle sugar on them, and that did it! i love sparkle sugar... that stuff makes anything better.


here are some of the cupcakes, ready to be transported to work. since i made two different kinds of cupcakes, i had a ton left over after our little independence day cookout, and my coworkers were glad for it!


P.S. why no red, white, and blue sprinkles, you ask? because i scoured every wal-mart, target, michael's, market street, tom thumb, kroger, and party city within a 20 minute drive of my house, and there were none to be had! i find that quite odd, but it's alright. my cupcakes turned out cute anyway, even if they would have been cuter with some darned sprinkles!

Monday, July 13, 2009

I Have Discovered Cupcakes

yes, i have discovered the beauty of cupcakes. little individual servings of cake, wrapped up and ready to go. and portion control is sort of built in. you can eat one for a small-ish piece of cake, or two if you're craving a big ol' piece of cake.

they're easy to transport- put them in a box and you're ready to go (this one is great- super cheap and fits 12-14 cupcakes like a dream). and, you can make just about any cake recipe into cupcakes. i recently made this recipe into cupcakes (blog post coming soon), and they're a hit at my office. and, many more cake recipes are tempting me to more cupcake madness...

Saturday, July 11, 2009

Candy Jewelry Box

i was bummin' around on the wilton website, and found this:


it's a ring box, made out of red candy melts and fondant, with a truffle center... and you are supposed to stick a real ring in it to propose with.

how ridiculously clever is that? you could also probably do the same thing with cake, using bakerella's box of chocolates cake as inspiration. i would absolutely die if a guy proposed to me with something like that. well, i'd say yes first, then i'd die.

my mom said, "no guy is going to go through that much trouble to make that little thing."
my first response was, "for me they will!"

my second response was, "well, maybe he can get his sister to make it for him."

Monday, July 6, 2009

Cupcake Burgers


i was inspired by the always-fabulous bakerella to make cupcake burgers for father's day. they're so cute, fairly easy, and pretty darn delicious too! plus, i got some icing tips, one fat star and one plain fat tip, and couplers at wal-mart on clearance, so i could make them look pretty good too. here are my tips on my "pastry bags," aka ziploc bags with their corners cut off (i can only be so fancy).


so, down to the details.
supplies:
  • one box white cake mix
  • one box brownie mix
  • one can white frosting
  • food coloring
  • optional: sparkling sugar (a course sugar; i got mine at wal-mart in the baking aisle next to the other cake decors)
yup, it's that easy. but for pete's sake, buy name brand mixes- it's worth the extra quarter. i used a store brand for these, and they were very dry the next day. oh, i ate them, but i didn't like them. i ended up just eating the brownie part with the frosting on it because the cake was so dry. but, moving on...

simply make the cupcakes according to the package directions (using liners so the sides aren't too brown). and make the brownies according to the package directions too, but bake for about 15 minutes in a 13x9 pan (so they'll be thin enough).

when cool, cut the cupcakes in half along their equators (not their international datelines, of course). cut the brownies into circles (i used the lid of my non-stick spray as a brownie cutter) and place in between the cupcake "buns."

meanwhile, divide the frosting into however many different toppings you want (i had three), and dye accordingly. you can use whatever "toppings" you like, but mine ended up having cheese, ketchup, and lettuce. the cheese was supposed to be mustard, but it wasn't quite yellow enough. bakerella used fancy frosting dyes so hers were much brighter, whereas i only had regular food coloring on hand. but, no matter, still cute!

then, frost on the toppings. i used the plain frosting tip for the cheese (just in a circle) and the ketchup (sort of squiggled on, almost like a flower), like so:


and i used the star tip for the lettuce, squiggled on sort of in between the ketchup, so that it would show through when the top was put on, like so:


and here they are with their tops on:


so cute!
and to make them look like sesame seed buns, i brushed a little melted butter (butter makes everything better) on top and sprinkled with sparkling sugar, which tastes much better than the real sesame seeds that bakerella used.


and here's my dear ol' dad about to chomp down on one of these bad little boys!

Friday, July 3, 2009

Lessons in Chocolate

no, i don't mean a textbook made out of chocolate. (but how fun would that be?) when i made s'mores pops, i learned some valuable lessons about working with chocolate flavored candy coating, so i thought i'd share my trials and solutions here.

don't drink water while you're working with chocolate. i was drinking ice water because it was really hot in my kitchen (don't worry, i could stand the heat). i grabbed my water and was taking a drink, and then... a drop of water fell into the chocolate coating. the coating immediately seized up and got all grainy and thick. ew, gross. it was completely unusable.

but no fear, there is a solution. i hopped on the internet and found you could just mix in paramount crystals to fix the problem. well, that's another problem: paramount crystals are available almost exclusively online. then i read that you could put shortening in it, but i was fresh out of that too.

then, i discovered the solution: vegetable oil. just mix it in until the chocolate is smooth again. thank you Jesus! the chocolate will take longer to harden, but harden it will. awesome.

Tuesday, June 30, 2009

A Hot, Fresh Batch of Links

um, these things are amazing. i wish i was this creative!

crafts:

baked goods:

Monday, June 22, 2009

Cookie Cake Pie

no, that's not a list of items, it is one single, solitary, satanic item. it's like the turducken of desserts. i saw it on cakespy and immediately started salivating. cakespy, in case you were wondering, is an evil genius. with a blog. evil geniuses are coming into their own in the 21st century, i guess.

anywho, i made two of these suckers and neither one of them lasted long enough to be photographed. so i'll just put cakespy's photos.


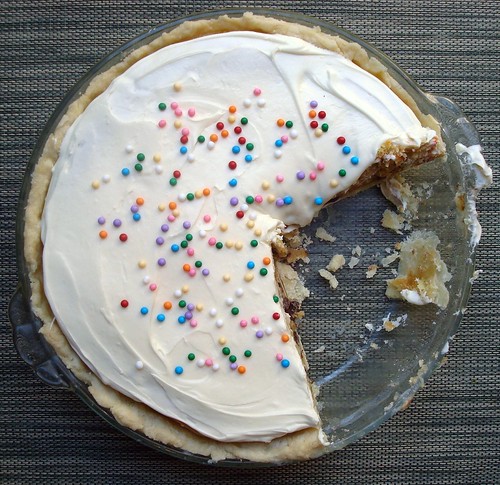
looks good, right? oh but wait, there's more...


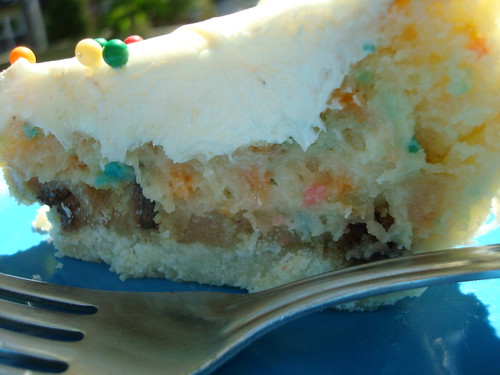
it's a pie shell with cookie dough in it, then cake batter, then frosted. oh, mah, gaw. cakespy made her own crust and dough, then used boxed cake and frosting. but i went all pre-fab and changed the flavors a bit too. it easily lends itself to such customization.

so, the first one i made, the cake didn't get cooked because my mom took it out too early. she didn't do the toothpick test, but said it just looked done... well, it wasn't, and the center was just warm batter. but of course, that didn't stop us from eating it. it just put me on notice that while the top may look fairly brown, it's not done and it won't burn, so stick to the toothpick test.

alright, down to the nitty gritty. you will need, for one (pre-fab) cookie cake pie:
-1 pie crust
-1 roll of chocolate chip cookie dough
-1 box of yellow cake mix
-1 can of chocolate frosting.

-preheat the oven to 350 degrees.
-defrost your pie crust, put it in a pie tin if it isn't in one already (the frozen crusts are by the fruit and cool whip and come in a pie tin, but the refrigerated ones are by the cookie dough in the grocery store and are just rolled).
-dock the crust (poke the bottom with a fork a few times), just to be safe.
-put the cookie dough in the bottom of the pie crust, about an inch thick. i found it best to break it up into little pieces (think grape or peanut m&m size) and drop them in the crust, and then gently sort of spread/push them together. be careful not to tear the crust. there will be dough left over (about 1/2 to 1/4 of the roll).
-mix up the cake mix according to the directions. pour it in the crust, over the dough. leave a little room for the cake to rise. you'll probably only use about half of it, so use the rest to make a single layer 8" cake, or something.
-bake until it passes the toothpick test (until a toothpick stuck in the middle comes out clean). for me, that was about 40 to 50 minutes. i'd say start checking at about 30 minutes, then every 10 minutes thereafter. it might start looking a little burnt, but unless it's black it's not burnt.
-cool, then frost with about half of the frosting. more if you want (of course), but i used only half so i could use the rest for the 8" cake i had made with the rest of the batter.

YUMMY! some people say it's too sweet, but that doesn't stop them from eating it. but i would advise a tall glass of milk to wash it down.

Friday, June 12, 2009

Carrot Cake Balls


i decided to give the cake balls another go, this time with carrot cake (and cream cheese frosting, of course) because that's what was in the pantry. and i coated them in white chocolate. i did a much better dipping job this time than last. for one, i made the balls smaller, using the larger end of a melon baller instead of just guessing. they held together better when they were smaller. also, i kept the chocolate warm by putting the ceramic bowl on top of a heating pad. i put the heating pad in another bowl to distribute the heat better, and put saran wrap over the heating pad to protect it, and so my dad doesn't get chocolate on his back the next time he uses the heating pad.

also, my technique was just better, in dipping the ball and wiping off excess chocolate and scooting onto the wax paper. i guess it just takes practice. and i drizzled the balls with white chocolate, which helped to camouflage any imperfections.

also this time, though, i made two 8" round cakes instead of one 13x9" cake, using half a can of frosting for each cake. i admit, this was at the request of my mother. she liked the cake balls but thought they were a little too sweet (they are), and being somewhat wary of some of my culinary innovations and experiments, she preferred the tried-and-true regular cake over the cake ball invention.
but that doesn't mean that i just made a plain ol' cake. well, i sort of did. but i added a little embellishment, while i had the white chocolate out for the cake balls. criss-crosses on wax paper...


then stuck into the cake!

sorta looks like it's from a fancy bakery, don't it? sort of. let me make a point here- the criss-crosses are important. if you just do loops (so the lines are all parallel, essentially), they just fall apart. so, criss-cross, people!

here's a piece of cake and some cake balls, before headed over to the neighbor's house.

and, the inside of a cake ball, before meeting its delicious, impending doom in my mouth.

see those little orange bits? carrots, right? wrong. they are "carrot flavored bits," as proudly advertised on the cake box's front! they're carrot powder, sugar, and some other binding stuff. the cake still tasted good, it just didn't really taste like carrot cake. more like a plain spice cake, which was still good, as i said.

Sunday, May 31, 2009

Mini Apple Pies Redux


i had extra apple pie filling, and the mini apple pies were so good, and i made so few of them in the first batch, that i decided to make more! this time, i made a crumble topping, which is sooo yummy. also this time, i found the regular pie crusts (which are by the cookie dough and biscuits) instead of the frozen ones in the pie tins. they were bigger, so i could make more mini pies. yay!

other than that, second verse same as the first. pie crust circles, apples from a can, topping (lots of crumble on the bigger ones, mini lattices on the mini ones). baked and checked every ten minutes. voila!


i sort of shot from the hip with the crumble topping. i started with about a quarter cup white sugar and half a cup flour and a few tablespoons butter... then my mom told me you make crumble topping with brown, not white, sugar. oops. so i threw some of that in there too. i think it ended up being like a cup of sugars and a half a cup of flour and a stick of butter. so, of course, i ended up with too much crumble topping. i really piled it on the regular-muffin-sized ones, and still had some left over... also had some leftover apples... and pie crust scraps... what to do?

apple crumble cobbler something-or-other!


an inside peek into the apple crumble cobbler something-or-other:


ok, so i realize it doesn't look that great, but it tasted like, oh man. it was amazing. in a glass pan, i put in the rest of the canned apples, and some fresh ones with some cinnamon and sugar, and put the pie crust scraps on top, and the rest of the crumble (and some cinnamon on top). bake at 350 for like 20 minutes (the check-every-ten-minutes method). it was so good. sort of like a crumbled up pie.

here's all three apple creations together: mini apple pies, micro apple pies, and apple something-or-other:


and, all three with, what else, whipped cream. talk about yummy.

Friday, May 29, 2009

Mini Apple Pies


i was inspired by not martha (via bakerella) to make mini apple pies a few weeks back... i know, i'm a lazy blogger. so, i made them in two sizes, in a regular muffin tin and in a mini muffin tin. and, because i'm also a lazy baker, i used all pre-made ingredients- a can of apple pie filling and frozen pie crust. i couldn't find the regular pre-made pie crust, so i had to get the kind that's already in the pie tin. i let the crust thaw, then laid it out on a cutting board and cut circles out of it, like so...


you can see the little crimps where it was in the pie tin. for the regular muffin size, i used a big ol' can of broth (probably like five inches across), and the cap of my cooking spray for the mini muffin size (about two inches across).


for the regular muffin size, i cut a little wedge out of the crust to make it fit better in the muffin tin. it probably could have stood a little more cut out, but it still helped.


next, just put it in the muffin tin, like so...


then i filled it with canned apple pie filling. as i was doing that, i thought how silly that was because apple pie filling is the easiest thing to do yourself- just cut up apples and sprinkle them with cinnamon and sugar. but, i already had bought two cans of the stuff, so i figured i'd use it. i did have to cut the apple wedges into smaller pieces, though- just sliced them up in the can.

for the tops, i tried to be fancy and make a lattice top. but, i didn't re-roll out the dough (i told you, i'm lazy), so i just used scraps.

here's the unbaked regular muffin tin pies:


and here's the unbaked mini muffin tin pies:


i also didn't use an egg wash to join the lattices to the pie dough cups, nor did i egg wash the tops. all that to say that mine didn't turn out as adorably as bakerella's. but they were still pretty darn adorable (what mini-food isn't?) and were pretty darn delicious.


instructions:
-preheat oven to 375 degrees. grease muffin tins.
-thaw pie dough, cut circles out of it.
-line muffin tins with dough circles, fill with apple pie filling (canned or your own cut apples sprinkled lightly with cinnamon and sugar).
-use scraps to make lattices, put lattices on pie cups and pinch edges of lattice to pie cup.
-bake for about 20 minutes (i checked mine every ten minutes), covering them with foil for the last ten minutes, until golden brown.

overall assessment: delicious and precious! will be making again in the future.