Friday, July 31, 2009

New Cookbook!

i just got the best bake sale ever cookbook at half price books! it has a ton of cookie recipes, but also has recipes for (according to the chapter headings) bars and brownies, breads and coffee cakes, cupcakes, rolls, and muffins, cakes, pies, and more. it even has tips on how to organize and run a successful bake sale.


i just flipped through the first few cookie recipes, and i wanted to make every single one of them. i can't wait to get crackin'!

Wednesday, July 29, 2009

International Goodies

to celebrate my membership in the george washington international law review, i decided to make an international treat. i was thinking about some sort of ethnic cookie, but i really wanted to do something russian, and they're not big on cookies. then, i remembered something my host mom made for me all the time when i studied abroad: oladi!

"what the heck is oladi?" i hear you asking. well, it's in the pancake family. it's like a small, thick, lightly leavened blini, and a blini is like a crepe. oladi, like much russian cuisine, are an inexact science... more of an art, i suppose. you mess around with it, get the hang of it, and after a few failures, it just clicks and you get it. in fact, there's a russian saying, "the first blini is always a lump," (по-русски: "первый блин всегда комом") meaning practice makes perfect, or if at first you don't succeed, try, try again.

so, away we go. ingredients (based on this recipe):
  • 1 egg
  • 2 cups (1 pint, or .5 liter) unflavored unsweetened kefir, available at a whole foods or wegman's type store; you can also use buttermilk or plain yogurt if you don't have kefir. you could even dilute some sour cream with milk... any sort of thick/fermented milk product will do.
  • 4 tbsp sugar (or more if you want sweeter, more desserty oladi)
  • pinch of salt
  • 10 tbsp flour, to start
  • 1 tsp baking soda, plus some vinegar
in a medium to large bowl, whisk together the kefir, egg, sugar and salt, just until blended. don't use a mixer! a fork works well.

next, whisk in the flour. you want it to be the consistency of thin sour cream. if it's too thin, add more flour by the tablespoon, whisking after each addition. i think i ended up having like 15 tablespoons or something in my batter. but start with 10: you can always add an ingredient, but you can't take it out.

now, at this point the original recipe said put a teaspoon of soda into a tablespoon, fill the tablespoon with vinegar, and mix into the batter. but i think if you just pour the soda into the batter, and before you mix it in, pour on 2 teaspoons of vinegar, and then mix it in. you're just trying to get some leavening in there. other recipes call for yeast, but this is easier. especially since i usually don't keep yeast around.

here's what my final batter looked like:


to cook these bad boys up, heat 5-6 tablespoons in a heavy skillet (i used our cast iron one, i think), over medium heat. the amount of oil is approximate; you just need enough to cover the bottom of the skillet, because you'll be frying these.

once the oil is hot, use a 1/4 cup measuring cup to ladle the batter into the pan. you want them to be about 2-3 inches in diameter, and you can do a few at a time, like so:

(sorry for the bad lighting- i was concentrating on not burning them or getting splattered with hot oil. no time to check the flash.)

fry them for about 2 minutes, then flip and fry on the other side for two minutes. make sure you have enough oil in the pan after each batch. these guys soak up a lot of it, so you'll most likely need to add more to make sure the bottom of the pan is covered.

i guarantee you'll burn your first one, so just get it out of the way so you can go on to rock the oladi. see, here's what they're supposed to look like (from tasterussian.com):


and here's my first batch:


pretty bad, i know. (actually, the burnt-ness doesn't mar the taste too terribly bad. they're still edible, just not as good as they should be.)
but, here's how some the rest turned out (most had been gobbled up by this point):


and here's a close up of the one with jam on it:


pretty darn good. serve them with sour cream and jam (cherry preferably, but raspberry or strawberry is good too). we were out of sour cream, so we just put jam on them, like the one on top. you could also serve them with something savory if you wished, and they'd make a good side dish to eggs and bacon. as you can see, they're generally a breakfast thing, but are fabulous as a dessert too.

cheers, to international law review and international treats!

Tuesday, July 28, 2009

Black(berry) Bottom Cupcakes


time for a delightful summertime desset- blackberry bottom cupcakes! i used livinglocurto's fresh blackberry cake recipe (she has a printable recipe there) and modified it a little and made cupcakes... and they were so delicious.

the texture of the cake was a little muffin-y, not as fine as regular cake, and not too terribly sweet, but the buttercream frosting definitely brought it into the cake realm. the cake has two tablespoons of lemon pudding mix in it, so that lightens and freshens the flavor up with just that hint of lemon, giving it another taste dimension.

my edits: i didn't have self-rising flour, but no problem. to make self-rising flour, you just add 1 1/2 tsp baking powder and 1/2 tsp salt for each cup of all purpose flour. and, i'll even do the math for you- 4 1/2 tsp baking powder, 1 1/2 tsp salt and 3 c. all purpose flour for this recipe.
also, i used frozen blackberries instead of fresh, because i'm cheap, but i otherwise followed her recipe.

so, here we go. ingredients:
  • 2 1/2 cups frozen blackberries (about 1-16 oz package), thawed and drained and blotted
  • 1 pinch of cinnamon
  • 2 1/4 cups sugar (split)
  • 1 cup softened butter
  • 1 teaspoon vanilla
  • 4 eggs at room temperature
  • 3 cups all purpose flour, mixed with 4 1/2 tsp baking powder and 1 1/2 tsp salt
  • 1/2 teaspoon salt
  • 2 teaspoons lemon instant pudding mix (you can make pudding later with the rest of the mix and 1 3/4 c milk)
  • 1 cup of milk
-defrost, drain, and blot the blackberries. sprinkle with 1/4 c. sugar and a pinch cinnamon. set aside.
-preheat oven to 350. line as many cupcake tins as you have with cupcake papers (this recipe makes about 42 cupcakes, so you'll do several batches).
-mix together flour, powder, salt, and pudding mix. set aside.
-beat butter with a mixer until fluffy, then add the 2 c. sugar and vanilla and beat well.
-add eggs, one at a time, beating to incorporate after each addition.
-add dry ingredients about 1 cup at a time, alternating with milk, and beating after each addition of dry or milk.
-put about 2-4 berries in each cupcake paper, then cover with a scoop of batter, filling about 1/2 to 2/3 full, like this:


-bake about 20 minutes, until a toothpick inserted comes out clean. it's ok if it comes out with blackberry juice on it, just as long as it doesn't have cake batter on it. this is what they'll look like, hopefully.


the blackberries sort of leak through the papers and leave some juice in the pan, so you should wipe it out with a damp paper towel before moving onto the next batch. be careful when you're eating the final product as well, lest you have sticky blue fingers!

-let cool completely, preferably on a wire rack, then frost with buttercream frosting. the recipe i used is below, but i am certainly not one to judge you if you use a canned buttercream frosting. nobody will notice, especially since you put so much effort into the cake part!


so, if you're inclined to make your own buttercream frosting, here's a really simple recipe from allrecipes.com that makes for a really fabulous frosting.

-1/2 cup shortening
-1/2 cup butter, softened
-1 tsp vanilla (i added a little extra splash, because i like vanilla)
-4 cups powdered sugar (that's about 1 lb, so you can use just one box or half a 2 lb bag or something)
-2 tbsp milk

beat together the shortening and butter until smooth.
add the vanilla and beat until incorporated.
add the sugar, about one cup at a time, incorporating well after each addition.
after all the sugar is in, or with the last 1 cup addition, add the 2 tablespoons of milk.
that's it! spread it on or pipe it if you want to be extra fancy. it's fairly stiff, so it lends itself well to piping.

here's a piped batch, ready to be shared with co-workers.


needless to say, these made me an office baking legend.

Monday, July 20, 2009

Maple Peach Apple Crumble

another adventure in crumble! also another adventure in, "what the heck am i going to make with these ingredients?"

i bought some peaches meaning to grill them, and then i decided that i didn't want to go through the hassle. so instead i chopped them up and put them into a pan and tossed them in a little cinnamon and sugar (a tablespoon or so). there weren't enough peaches to fill out the 8x8 pan, so i chopped up an apple to add to the mix, again tossing to coat with some sugar and cinnamon.


then, the glorious topping... i used a packet of maple brown sugar instant oatmeal, about 1/4 cup all purpose flour, probably about 1/2 cup brown sugar, about a half a stick of cold butter, with a pinch of salt and a dash of cinnamon. then, i cut it together with a pastry cutter (a fork would also work). i think i ended up adding some more butter and brown sugar, and a bit of flour, because i wanted a lot of crumble. like i've said before, that's the best part anyway.

i threw that sucker in a 350 degree oven for about 30 minutes, or until the topping was crispy and nothing (i.e. apples) was too firm when i stuck a fork in it. really, nothing in this needs to be cooked--you could just eat it raw and be a-ok--it just tastes better warm. so, if you don't cook it enough, it's really no big deal. or, if you take a bite and it's not cooked to your liking, just put it back in for ten minutes or so.


here's a side view, after it came out of the oven. it's pretty shallow, but you can sort of see that there's quite a bit more crumble than fruit, or at least equal parts.


fruity crumbles like this are a shoot from the hip, or fly by the seat of your pants, kind of dessert (you can pick your own idiom there). no real chemical reactions need to happen, like leavening in cakes, so you don't have to worry about proportions too much. nothing needs to be cooked, like eggs in cookies (although i eat raw cookie dough all the time), so you don't have to worry too much about bake times. and most of the flavors are in the fruit, so you don't need to really add anything. and, if you screw up, you can fix it along the way. you can always sprinkle on some more sugar or bake it a little longer.

in short, i'm a fan of making fruit crumbles. easy and delicious! here's the damage done after one evening- about half gone... because it was so tasty!

Sunday, July 19, 2009

Gourmet (Looking) Blueberry Muffins


my parents go to a small church with only the main worship service (no sunday school or anything), and it gets out pretty early, at around 10am. so we usually go to breakfast afterwards. well, one sunday, we went to mimi's cafe, and i ordered a meal that had a blueberry muffin with it. i was so full from everything else that i couldn't eat the muffin, but it looked so good that i wanted to save it for later... but my parents wanted it right then! when i protested, my mom said, "why don't we just make some blueberry muffins today?" i acquiesced, and she ate part of my muffin.

so, after we left the restaurant, we went to the grocery store and bought a blueberry muffin mix. i wanted to get some additional fresh blueberries to put in there, but instead we just got a mix that boasted having a can of real blueberries (betty crocker, i think), which was enough for me.

when we got home, i made the muffins. i followed the directions on the box and everything. but, you know me, i can't leave well enough alone when it comes to cake mixes. so i made a crumble topping and put a generous amount of that on the muffins, and also topped them with sparkle sugar!


the muffins baked up so nice and golden brown, and a little crunchy with the sugar and the crumble. oh man, were they good!


they looked so gourmet and special, and they tasted delicious! i was so impressed with those muffins, even more than i usually am.

so, here's the "recipe:"
  • make the muffin mix: this is pretty self-explanatory--get a mix and follow the directions. fill the muffin tin cups only about halfway, to leave room for the crumble, which is really the best part anyway.
  • make the crumble topping: crumble topping is an inexact process, but here's a good starting point: 1/2 cup flour, 1/2 packed brown sugar, 1/2 stick cold butter (you want a crumble, not a dough), and a splash of cinnamon (optional) and a pinch of salt (also optional). pulse in a food processor. or if you don't have one, like me, use a fork or a pastry cutter to sort of mash the butter and the sugar together. if you think it needs more sugar or butter, add it. you can also add some oatmeal instead of some of the flour, or in addition. like i said, crumble topping is quite imprecise. just do it until it tastes good.
  • spoon the crumble into the muffin cups. be liberal! like i said, the crumble topping is really the best part anyway.
  • sprinkle each muffin with a pinch or two of sparkle sugar.
  • bake as directed on the muffin mix, maybe a little longer to crisp up the crumble topping.
  • voy-ola! gourmet muffins that nobody will ever know came from a mix!

Patriotic Cupcakes

(picture from the salty cod)

what's more patriotic and american than apple pie? the answer is simple: cupcakes.

cupcakes came about in the 1800's in america, making them another great american invention. the name comes both from the small proportions--the original ones were baked in earthenware cups and such--and from their proportions, measured in cups. the original cupcake recipe is 1 cup butter, 2 cups sugar, 3 cups flour, 4 eggs. and, this was a big switch from weighing ingredients to measuring them by volume, using the anglo-american 'cup' instead of the metric system. this switch made them easier for the everyman (well, everywoman really) to make, as did the cupcake's diminutive size, because big cakes often took a really long time to cook over a hearth and often burned, but those problems were reduced with cupcakes. (thanks to food timeline and cupcakes take the cake for the history!)

alright, enough with the history lesson, let's get to the baked goods! i made some patriotic cupcakes for the fourth of july (which i fully realize was a good two weeks ago). first, i made some delicious red velvet cake cupcakes (yes, from a mix), and piped on some (canned) cream cheese frosting, and topped with blue sugar for a patriotic flair--red cake, white frosting, and blue sugar!


then, i made some red, white, and blue cupcakes--the batter itself was red, white, and blue! i divided the white cake batter (again, mine's from a box) and dyed one part red and one part blue (BIG NEWS: i got wilton gel colors! so now my stuff will be nice and bright, not like the weak colors i had on my cupcake burgers). so, i saw this on chica and jo and knew i had to make them. only mine weren't as swirl-y as chica and jo's, but they still looked awesome. and the patriotic cupcake wrappers didn't hurt...


and i frosted mine with (canned) chocolate cream cheese frosting, because i have a penchant for chocolate. i wanted to pipe it on and make it look all spiffy... but after i piped a few, the frosting started melting and sliding off. so after i frantically yelled for my mom to come help me, i scraped all the frosting off and just spread it on with a butter knife. but they still needed a little something extra... so i put sparkle sugar on them, and that did it! i love sparkle sugar... that stuff makes anything better.


here are some of the cupcakes, ready to be transported to work. since i made two different kinds of cupcakes, i had a ton left over after our little independence day cookout, and my coworkers were glad for it!


P.S. why no red, white, and blue sprinkles, you ask? because i scoured every wal-mart, target, michael's, market street, tom thumb, kroger, and party city within a 20 minute drive of my house, and there were none to be had! i find that quite odd, but it's alright. my cupcakes turned out cute anyway, even if they would have been cuter with some darned sprinkles!

Friday, July 17, 2009

Interior Design Personality

i know this is a blog about cookies (and sometimes crafts), but you should have a good place in which to enjoy your baked goods, right?
i took this quiz from the international school of colour and design (ht: how about orange) to find my interior design personality. i think it totally pinned me- "high street classic." sort of combining classic and modern.

here's my "style personality" pictures:

and here's my "magazine cover" picture:

so, what's your style personality? leave me a comment and let me know!

Thursday, July 16, 2009

(Dark) Chocolate Cookies


i made this recipe from one of my favorite blogs, living locurto (she's from texas, how can i not love her?). the recipe is on her site (that's right, i'm making you go to her site for it- don't be lazy, now).

basically, it's a dark chocolate cake mix with butter, brown sugar, eggs, vanilla, chocolate chips, and nuts. for my version, i used devil's food cake mix because i couldn't find dark chocolate cake mix. it turned out well with the devil's food, although i did later find the dark chocolate mix at target, so i might have to try them again with the dark chocolate mix this time. and i put in semi-sweet chocolate chips, as directed, and used pecans for my nuts.

man, were they good! i was afraid that they would be a little cake-y, being from a cake mix and all, but they were nice and chewy, just like i like 'em. and, the original recipe calls for cream cheese, but i didn't use any and they were still delicious. the only thing i'd do differently next time, other than maybe use a dark chocolate cake mix, is add more nuts. the cookies were quite chocolate-y, and having more nuts would have balanced it out quite nicely.

now, these got all scarfed up before i could take a picture, so i'm posting a picture from living locurto's site. mine were a little flatter than hers, but essentially the same.

overall assessment: great recipe- easy with phenomenal results!

Monday, July 13, 2009

I Have Discovered Cupcakes

yes, i have discovered the beauty of cupcakes. little individual servings of cake, wrapped up and ready to go. and portion control is sort of built in. you can eat one for a small-ish piece of cake, or two if you're craving a big ol' piece of cake.

they're easy to transport- put them in a box and you're ready to go (this one is great- super cheap and fits 12-14 cupcakes like a dream). and, you can make just about any cake recipe into cupcakes. i recently made this recipe into cupcakes (blog post coming soon), and they're a hit at my office. and, many more cake recipes are tempting me to more cupcake madness...

Saturday, July 11, 2009

Candy Jewelry Box

i was bummin' around on the wilton website, and found this:


it's a ring box, made out of red candy melts and fondant, with a truffle center... and you are supposed to stick a real ring in it to propose with.

how ridiculously clever is that? you could also probably do the same thing with cake, using bakerella's box of chocolates cake as inspiration. i would absolutely die if a guy proposed to me with something like that. well, i'd say yes first, then i'd die.

my mom said, "no guy is going to go through that much trouble to make that little thing."
my first response was, "for me they will!"

my second response was, "well, maybe he can get his sister to make it for him."

Friday, July 10, 2009

Musette Bracelet GUEST GIVEAWAY!!!!

Musette Bracelet GUEST GIVEAWAY!!!!

this bracelet is really cute. turquoise and copper. not quite my style, but i'm sure my mom or my best friend would absolutely love it!

Monday, July 6, 2009

Cupcake Burgers


i was inspired by the always-fabulous bakerella to make cupcake burgers for father's day. they're so cute, fairly easy, and pretty darn delicious too! plus, i got some icing tips, one fat star and one plain fat tip, and couplers at wal-mart on clearance, so i could make them look pretty good too. here are my tips on my "pastry bags," aka ziploc bags with their corners cut off (i can only be so fancy).


so, down to the details.
supplies:
  • one box white cake mix
  • one box brownie mix
  • one can white frosting
  • food coloring
  • optional: sparkling sugar (a course sugar; i got mine at wal-mart in the baking aisle next to the other cake decors)
yup, it's that easy. but for pete's sake, buy name brand mixes- it's worth the extra quarter. i used a store brand for these, and they were very dry the next day. oh, i ate them, but i didn't like them. i ended up just eating the brownie part with the frosting on it because the cake was so dry. but, moving on...

simply make the cupcakes according to the package directions (using liners so the sides aren't too brown). and make the brownies according to the package directions too, but bake for about 15 minutes in a 13x9 pan (so they'll be thin enough).

when cool, cut the cupcakes in half along their equators (not their international datelines, of course). cut the brownies into circles (i used the lid of my non-stick spray as a brownie cutter) and place in between the cupcake "buns."

meanwhile, divide the frosting into however many different toppings you want (i had three), and dye accordingly. you can use whatever "toppings" you like, but mine ended up having cheese, ketchup, and lettuce. the cheese was supposed to be mustard, but it wasn't quite yellow enough. bakerella used fancy frosting dyes so hers were much brighter, whereas i only had regular food coloring on hand. but, no matter, still cute!

then, frost on the toppings. i used the plain frosting tip for the cheese (just in a circle) and the ketchup (sort of squiggled on, almost like a flower), like so:


and i used the star tip for the lettuce, squiggled on sort of in between the ketchup, so that it would show through when the top was put on, like so:


and here they are with their tops on:


so cute!
and to make them look like sesame seed buns, i brushed a little melted butter (butter makes everything better) on top and sprinkled with sparkling sugar, which tastes much better than the real sesame seeds that bakerella used.


and here's my dear ol' dad about to chomp down on one of these bad little boys!

Saturday, July 4, 2009

Gorgeous Dress!


this dress is so beautiful... classy, a little vintage... and it's free!

http://downandoutchic.blogspot.com/2009/07/giveaway-bb-dakota-dress.html

Friday, July 3, 2009

Lessons in Chocolate

no, i don't mean a textbook made out of chocolate. (but how fun would that be?) when i made s'mores pops, i learned some valuable lessons about working with chocolate flavored candy coating, so i thought i'd share my trials and solutions here.

don't drink water while you're working with chocolate. i was drinking ice water because it was really hot in my kitchen (don't worry, i could stand the heat). i grabbed my water and was taking a drink, and then... a drop of water fell into the chocolate coating. the coating immediately seized up and got all grainy and thick. ew, gross. it was completely unusable.

but no fear, there is a solution. i hopped on the internet and found you could just mix in paramount crystals to fix the problem. well, that's another problem: paramount crystals are available almost exclusively online. then i read that you could put shortening in it, but i was fresh out of that too.

then, i discovered the solution: vegetable oil. just mix it in until the chocolate is smooth again. thank you Jesus! the chocolate will take longer to harden, but harden it will. awesome.

S'mores Pops

i'm very proud of these because i came up with the idea all by myself. i feel so creative! it occurred to me after i went camping and still had some leftover marshmallows from real s'mores.

they don't look particularly delicious, but they really are. and so simple, too. basically, they are marshmallows on sticks, dipped in chocolate, and covered in graham cracker crumbs. so let's break it down.

1. i had these lollipop sticks that i bought on sale. they were a bit long, so i cut them roughly in half (just eyeballed it).


2. i stuck the sticks into the marshmallows. i stuck the unfinished cut end into the marshmallows to camouflage the rough ends.

TIP:
the more stick in the marshmallow, the better. they get a little heavy with the chocolate on them, so they need support. put the sticks as far into the marshmallows you can without poking out the top and insert the stick through the longest part of the marshmallow, as shown below.


3. melt some chocolate flavored candy coating. i got mine from walmart. i also put in about half of a hershey's bar to make it more chocolate-y.

TIP: i put the bowl of chocolate on top of a heating pad to keep it from solidifying so fast. and, i covered the heating pad with some saran wrap to protect it from drips. you can sort of see it in the picture here.


4. dip the marshmallows on sticks into the chocolate. make sure to get chocolate all over it, even on a bit of the stick to help the marshmallows stay on the sticks.

TIP: after you dip them in the chocolate, you may need to scrape some of the chocolate off. "what? scrape off chocolate?" i hear you saying... but if you don't, they'll be too heavy and the graham cracker and chocolate will fall off.

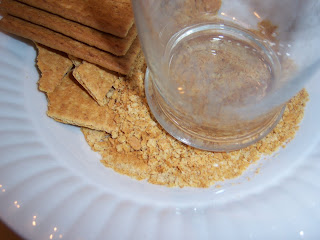
5. dip, roll, and/or sprinkle the pops with graham cracker crumbs. i used the bottom of a glass to mash the graham crackers into crumbs. but, i hear you can also buy the crumbs in boxes if you like.


6. let the chocolate solidify, and they are ready to eat! i laid them down on wax paper because they were too top-heavy to stick in styrofoam or something. voila! let's take another look at them...

Thursday, July 2, 2009

Is it an Apron or is it Lingerie?


i don't know, and i don't care- i want one!

these retro inspired aprons from carolyn's kitchen are the cat's meow. i can use it for an apron now, and then as lingerie later, for some sexy cooking with the TBDH.* superdy duperdy cute, any way you slice it.
(ht: cakespy)

here are more of my faves:


*TBDH stands for "To Be Determined Husband," as in the husband that i don't have now but some day will. *sigh*